Receiving and Saving Incoming Email Images and Attachments with Paperclip and Rails 3

The last post showed how the use of Test Driven Development can help create Rails apps that can receive email offline that can be plugged into one of the incoming email solutions to receive email. The example was a movie poster model that took the subject of the email and added it as the title of that movie. The thing is what’s a movie poster without images? In this post I am going to cover how you can extract an image out of an email and attach it to a model using Paperclip.

We’ve already covered how to receive the email using CloudMailin and the app’s controller and pass it onto a mailer so I’m only going to cover the code we need in our mailer and models here.

Getting Paperclip setup

The first step is to get paperclip installed into our app. I would recommend following the instructions in the Paperclip readme here to get your app set up with Paperclip and test everything works with a normal controller and form. Our movie poster will need the following setup:

We start by adding the migration to add the Paperclip columns to the migration

t.string    :poster_file_name
t.string    :poster_content_type
t.integer   :poster_file_size
t.datetime  :poster_updated_at

We also need to add the magic Paperclip line to our Movie model

has_attached_file :poster, :styles => { :medium => "300x300>", :thumb => "100x100>" }

So far everything has been exactly the same as we would normally have to do if we were using the normal forms based approach to upload, next we’ll add the code to our mailer.

Setting up the Mailer to Receive Attachments

Normally when Rails receives an uploaded file it has to be through a multipart/form-data. When a Rails app receives these files it recognises the attachment parameter and behind the scenes a temporary file is created containing that content. This is to stop the attachment being stored in memory. This file is then extended by Paperclip to contain a few additional bits of information it’s original file name and the content type of the upload. Our email however is stored in memory and it’s attachments don’t get stored as files. For that reason we need to emulate the temporary file so that Paperclip can correctly work with out attachments.

In order to do this we can use the following mailer:

class MovieMailer < ActionMailer::Base
  # Create an attachment file with some paperclip aware features
  class AttachmentFile < Tempfile
    attr_accessor :original_filename, :content_type
  end

  # Called whenever a message is received on the movies controller
  def receive(message)
    # For now just take the first attachment and assume there is only one
    attachment = message.attachments.first

    # Create the movie itself
    Movie.create do |movie|
      movie.title = message.subject

      # Create an AttachmentFile subclass of a tempfile with paperclip aware features and add it
      poster_file = AttachmentFile.new('test.jpg')
      poster_file.write attachment.decoded
      poster_file.flush
      poster_file.original_filename = attachment.filename
      poster_file.content_type = attachment.mime_type
      movie.poster = poster_file
    end
  end
end

Here we can see the AttachmentFile class that fakes the parameters needed by Paperclip to work with the file. We then create the AttachmentFile class passing in a filename to be used for the temporary file. Then we write to the file, flush the contents and set the required parameters for Paperclip.

Now when we receive an email the first attachment is taken from the email and stored as our movie poster with by Paperclip.

If you don’t want to use a temporary file you can also use a StringIO object and see the same benefits.

In addition to this @pedrodelgallego pointed out another posible solution that extends a StingIO class anonymously using class eval using the following code:

attachment = message.attachments.first

file = StringIO.new(attachment.decoded)
file.class.class_eval { attr_accessor :original_filename, :content_type }
file.original_filename = attachment.filename
file.content_type = attachment.mime_type

Hopefully this will be of use for anyone trying to store attachments extracted from emails. The real benefit is that Paperclip doesn’t only work with images, you can store all sorts of attachments and push them to S3 if you need to. If anyone has any other suggestions or better ways to achieve this I’d also love to hear them.
Receiving Test Driven Incoming Email for Rails 3

One of the most frequent questions we are asked at CloudMailin is how can you develop your application and receives email offline, without opening ports, in a Rails app.

There are options that spring to mind. The first is to write a script that delivers a local email to your app simulating the response that you would get from an email server. The second solution is far simpler. You can perform test driven development and it can be really easy  get things up and running in development and even easier to move to production.

Here we are going to create a really simple example to take the subject of an email and create a model called movie poster from that subject. In a later post we will show how we can also use the attachments to create the images for the poster.

The First Step, a Controller to Receive the Email

In a previous article I highlighted a number of options for Receiving Email in Rails 3. Using some of the approaches you don’t even need to use a controller but in that case where email is delivered to your app via an HTTP POST the controller is needed. The controller doesn’t have to be complicated though. All we really want to do is pass a mail object to the receive method of our mailer. So supposing we have a mailer called MovieMailer we can do the following:

class IncomingMailsController < ApplicationController
   skip_before_filter :verify_authenticity_token
   
   def create
     # create a Mail object from the raw message
     movie_poster = MovieMailer.receiver(Mail.new(params[:message]))
     # if the movie poster was saved then send a status of 201 else give a 422 with the errors
     if !movie_poster.new_record?
        render :text => "Success", :status => 201, :content_type => Mime::TEXT.to_s
    else
      render :text => movie_poster.errors.full_messages.join(', '), :status => 422, :content_type => Mime::TEXT.to_s
   end
  end
end

The example above assumes that you are using at least Rails 3.0 but it can easily be converted to work with older versions of Rails and you could use the TMail gem rather than Mail if you need to.

Now we have this controller we can create a functional test to check this in the same way we would any other controller in our app (note I’m doing this the wrong way round for illustration you should really write your test first!). If we mock the response from the Mailer for now we can use something like this with Shoulda but you could use RSpec or any other testing framework just as easily:

class IncomingMailsControllerTest < ActionController::TestCase
   context "An IncomingMailsController" do
     context "on POST to :create with an invalid item" do
        setup do
           MoviePoster.any_instance.expects(:valid?).returns(false)
           post :create, :message => "From: #{@user.email}\r\nSubject: New Poster\r\n\r\nContent"
      end

      should_respond_with 422
      should "not create the item" do
        assert assigns(:item).new_record?
      end
    end

    context "on POST to :create with a valid item" do
      setup do
        MoviePoster.any_instance.expects(:valid?).returns(true)
        post :create, :message => "From: #{@user.email}\r\nSubject: New Task\r\n\r\nContent"
      end

      should_respond_with 201
      should "set the items title to be the message subject" do
        assert_equal "New Task", assigns(:item).title
      end
    end
  end
end

I have also created a really simple email message to pass as the message param here as an example with the header and body separated by two carriage return new lines but this isn’t really necessary with the use of mocha.

From: example@example.com
Subject: Subject

content

So on to the Mailer

Now that we have our controller sorted and fully tested we can create our Mailer, which will automatically create a functional test. It’s then just a case of adding the tests to test the receive method. The first step is to create a sample email that we can use in each of our tests. I am using the Mail gem again to do this.

  context "A MoveMailer" do
    setup do
      @message = Mail.new do
        from "test@example.com"
        to "test@example.com"
        subject "New Movie"
      end
    end

Then we can add our tests making use of the example mail we added and changing any of the parts we want to.

  should "create a new movie poster with the email subject" do
    @message.subject = "new subject"
    assert_difference("Movie.count", 1) do
      movie_poster = MovieMailer.receive(message)
      assert movie_poster.persisted?, movie_poster.errors.full_messages
      assert_equal "new subject", movie_poster.subject
    end
  end

In this case we’re just going to add one test and we can now create our simple movie mailer to take the subject from the email and store it as a poster.

class MovieMailer < ActionMailer::Base

  # Called whenever a message is received on the movies controller or through the rails runner
  def receive(message)
    # For now just take the first attachment and assume there is only one
    attachment = message.attachments.first

    # Create the movie itself
    Movie.create do |movie|
      movie.title = message.subject
    end
  end
end

Now when your app goes into production you just deliver the message to the controller using the HTTP Post approaches, directly to the mailer using any of the other approaches discussed in the previous article.

Although the example is a little contrived you can hopefully See how you can benefit from testing at the development machine to ensure you system works perfectly once you put your code into production. You also have the added benefit of not having to keep checking things whenever you change your code. Just re-run your tests, same as you would with any other part of your app!

A Step by Step Guide to Receiving Email in your Web Application with CloudMailin

In this post, we’re going to take a step by step guide approach to configuring and receiving your first email in you web app with CloudMailin. CloudMailin allows you to receive email in your web app via an HTTP POST. You setup the server to point to your site’s public url and your email is sent straight to the site. We will also cover how to add your own domain name and set it up so that you can give customers your own email address.

The first step is to head to http://CloudMailin.com and signup for a free account.

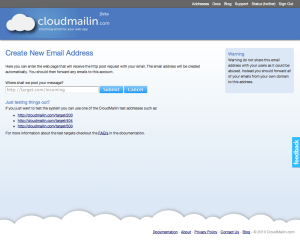
As soon as you sign up, you will be presented with the option to create your CloudMailin address. Here you enter the url of page that you wish to receive your email via HTTP Post at. After you click submit, an email address will be generated for you and anything you send to that email address will be sent to your website.

Once you click the submit button, the site will generate your email address and you will be ready to go. You will be redirected to the address list page. Here you can see each of your CloudMailin addresses, the target, that your HTTP Post will be sent to when an email is received and the plan details. Each CloudMailin address sits in its own plan so you can have different allocations for each address and therefore web app you want to receive email within. Currently the site is in beta so there is only one free plan. However once the site launches, there should always be a free plan to get started.

If you click on the address listed in the address list, you are taken to the page for that address. On this page are a number of configuration options for the address but also the delivery status list. The delivery status list is a powerful feature that allows you to see each email that passes through the system and the status of that message.

So lets go ahead and send an email to the address that CloudMailin has given us. We should almost instantly get a response back saying that the message delivery has failed.

What? The delivery failed? When we take a look at the delivery status page we can not only see that the message has failed but see that the target gave a status code of 404 because we never set up a page to receive the email. CloudMailin is clever enough to know the difference between the status codes that it receives when it delivers the email. If it receives a status code like 200 it assumes that everything was ok and the message was received successfully. If the target server has an error then or is unavailable then CloudMailin will tell the server that an error has occurred and that it should retry later. Finally if a status code like 404 or 422 occurs then it will tell the server that the message was rejected and that it should not try again later. More details about the HTTP responses that you can give to CloudMailin and the actions taken can be found in the HTTP status codes documentation. You can even send a custom bounce message when you reject the delivery of an email so long as your response is in plain text.

Ok so now its time to write some code and receive our email. If you are using Rails, you can take a look at some previous blog posts. There are also some examples in the parsing the email documentation. CloudMailin is language agnostic though, you can use it to receive incoming email in Java, PHP, Python, .Net, Scala, Small Talk or any other language that you want (so long as it can parse HTTP Posts). We are hoping to expand the languages in the documentation and they are all on github so feel free to contribute documentation for your favorite language! The request is sent to your server in the same way as any other form that you would fill in on your site as a multipart/form-data request. The plaintext and html parts are also nicely separated out to make life easier but the full email is available to allow more detail and attachments if it’s needed. The HTTP Post format documentation should help here.

Great, so now we have our server configured correctly, we’re ready to receive our email. So lets go ahead and send another email to our CloudMailin email address.

Awesome, Green lights! So now we’re successfully receiving our emails and processing the contents. What else can we do? Well, if you take a look down the right hand side of our address page, there’s a button labeled custom domains. This allows us to use our own domain name to receive email with whatever address we want. In order to do this though we need to start by configuring our DNS server to point any emails sent to our domain to the CloudMailin server. The documentation has a page dedicated to showing you how to configure your DNS server’s MX records to point to the CloudMailin servers and allow you to receive email via your own domain.

Once we have configured our DNS records we can go ahead and add our domain name to the custom domains form that we can open using the custom domains button. If you want to create client subdomains like anything@x.example.com and anything@y.example.com you can also add subdomains.

So that’s it. Using CloudMailin we can pretty easily receive email in our web apps. We’d love to hear what you create and also remember all of the documentation is on Github so if you have changes or additions or importantly examples for other programming languages and frameworks then please fork the documents and send a pull request. Most importantly feedback is always appreciated.

Multipart Body – A gem for working with multipart data

Multipart queries are used quite a lot in the transfer of data around the Internet. There are a number of projects out there that will generate multipart content such as email libraries and even web frameworks for uploading and working with files. When we came create parts of CloudMailin we couldn’t find a gem that would easily allow us to encode multipart content the way we wanted to. We could have used a library that already this ability it baked in but most of them didn’t work with eventmachine and if they did then we couldn’t be sure that they would work with any testing tools that we created later that didn’t rely on eventmachine. Although loads of libraries were implementing this code we couldn’t find anything that was standalone that we could just use across any of the different libraries that could post content.

In order to solve this issue we created our own internal multipart creation code. This weekend we have released that code as a gem called multipart_body. This gem is far from perfect and we have a list of things that we don’t have time to add and we would love some help with but the code has been useful to us so we hope it will be useful to others too.

The gem itself consits of two parts. Multipart body and the parts. To get started just install the gem


$ gem install multipart_body

Once the gem is installed you can create a form-data multipart body using this quick hash shorthand.

require 'multipart_body'
multipart = Multipart.new(:field1 => 'content', :field2 => 'something else')

To get a little more control you can create the parts yourself and use them to create the body:

# using a hash
part = Part.new(:name => 'name', :body => 'body', :filename => 'f.txt', :content_type => 'text/plain')

# or just with the name, body and an optional filename
part = Part.new('name', 'content', 'file.txt')
multipart = Multipart.new([part])

You can also pass a file to the multipart hash to automatically assign the filename:

require 'multipart_body'
multipart = Multipart.new(:field1 => 'content', :field2 => File.new('test.txt'))

The resulting output can then be created as follows:

part.to_s #=> The part with headers and content
multipart.to_s #=> The full list of parts joined by boundaries

So the following code example will create the output that follows:

multipart = MultipartBody.new(:test => 'content', :myfile => File.new('test.txt'))
------multipart-boundary-808358
Content-Disposition: form-data; name="myfile"; filename="test.txt"

hello
------multipart-boundary-808358
Content-Disposition: form-data; name="test"

content
------multipart-boundary-808358--

Like I said before the gem is far from perfect. At the moment it doesn’t have any documentation and it is missing quite a few features. By default it assumes you are creating form-data content and encodings are completely missing at the moment.

Hopefully though with a little bit of help it can provide a great starting block for anyone wishing to implement multipart bodies so that each library doesn’t have to re-invent this. If anyone has any time I’d love to see patches to bring this up to something much more useful.

Receiving Incoming Email in Rails 3 – choosing the right approach

When it comes to sending mail in Rails there are plenty of solutions and the best practices are fairly widely known. There are also a number of third party systems that can help you out. Receiving email in Rails however is a slightly less documented prospect.

Here I will cover some of the basic options for receiving email with some of the advantages and disadvantages. In later articles I will cover how to set up some of the solutions including the server. In each case I will also give a small example showing how you can find a user from the message’s to field update another from the message body. I don’t want to get too into the setup specifics of each approach at this point, instead I want to point out the alternatives and how you can make use of each. From what I can tell there are four main alternatives:

  • The ‘Official Way’ – using a mail server and script/rails runner
  • Using a mail server and cURL
  • Polling using IMAP/POP3
  • Use a Service Provider

It should be noted that I am the creator of one of the service providers (CloudMailin) however I appreciate that not all people want to use external services or have different needs and I am trying to make this article as objective as possible. Having said that if you do have comments please feel free to contact me.

Receiving Email the ‘Official Way’

The rails documentation is pretty sparse on incoming emails however the guides do contain a small snippet. Firstly you need to create a receive method in your ActionMailer. Something like the following for our example:

class MyMailer < ActionMailer::Base
  def receive(message)
    for recipient in message.to
      User.find_by_email(recipient).update_attribute(:bio, message.body)
    end
  end
end

As you can see the ActionMailer class is quite simple, then all that is left is to wire up your server so that any incoming email is sent directly to ActionMailer. This can be done by making sure that your mail server executes the following command:

app_dir/script/rails runner 'MyMailer.receive(STDIN.read)'.

This approach has some serious disadvantages though, especially when it comes to scalability. Firstly every time you receive an email you are spawning an new instance of your environment with script/rails. This is a nightmare in itself. Along with this you also need a copy of your app on the same server as the mail server. So you either have to add the mail server to your app server or you need another server and copy of your app running for the mail. You also have the hassle of setting up a dedicated mail server just for the purpose of receiving these incoming emails.

The same approach using cURL

In order to improve this method it is possible to remove the call to script/rails runner and replace it with a call to the web app via HTTP using cURL. Using this method when a new email arrives the following is called:

ruby receiver.rb

Then we create our receiver something like the following:

# note the backticks here execute the command
`curl -d "message=#{STDIN.read}" http://localhost/incoming_messages`

Update: In the comments it turns out that some people have reported problems with this method. You may need to escape the content so that your app receives the message correctly. The following method should help:

require 'cgi'
# note the backticks here execute the command
`curl -d "message=#{CGI.escape(STDIN.read)}" http://localhost/incoming_messages`

You could of course remove Ruby from the mix here entirely but using a Ruby script allows you to perform any processing if you want to in a more complex example. cUrl -d will send the request as application/x-www-form-urlencoded but you could also send the data multipart/form-data if you wish.

You can then simply create a normal controller and use the create method to receive your email as an HTTP POST. Something like the following:

def create
  message = Mail.new(params[:message])
  for recipient in message.to
      User.find_by_email(recipient).update_attribute(:bio, message.body)
    end
  end
end

This method has the advantage of being a little more scalable as nothing really changes in terms of your app. You simply receive the message over HTTP like any other form post or file upload. You may want to opt to move the processing out to a background job though if you are doing anything complex with the message. You will still however need to install and setup your own mail server.

Using a Third Party

In the last example we received email via an HTTP Post as a webhook. There are a couple of options for taking the setup and monitoring stress out of receiving mail in this manor without having to install an configure a mail server. Two of the options here are CloudMailin and smtp2web.

CloudMailin is currently in free beta and allows you to register to receive email via HTTP Post. The system was designed to be scalable and provide some additional features like delivery logs to make sure your app is receiving the emails. That’s enough about that one as I don’t want to be biased.

smtp2web is a google app engine instance that can be used to achieve a similar goal. It make use of app engines ability to receive email and then forwards the messages on to your web app.

Both of these options are designed to operate in ‘the cloud’ and don’t require you to own or setup a mail server to do the work. You will again probably want to make sure that you move processing over to a background worker if you have anything complex to do so that the processing doesn’t take up resource that should be serving your app to your customers.

Polling Using IMAP or SMTP

Finally this solution makes sense when you need to collect messages from an existing mailbox. You don’t have to own your own mail server but you will need to be able to run cron or a daemon to collect mail at regular intervals.

Although you could roll your own collector there are a couple already out there. Take a look at mailman for example. This approach can either rely on direct acces to your blog or can again POST via HTTP.

I will also look to write a separate post on MailMan as I think the power offered by MailMan is a worth a blog post in itself. Although there will be a delay with any polling as you can only poll every few minutes, in some situations using an existing mailbox is the only option.

Although this was brief, it should have given a quick introduction into some of the approaches available (I’m sure there are more too). I also plan to write a number of follow up articles showing how to implement options described here. If you have any advice, an alternative option or even an approach you would prefer to see covered first then please jump in and comment. Again if you have any comments on CloudMailin please let me know on here, twitter or via email at blog-comments [you know what goes here] cloudmailin.com

Thoughts on Google Priority Inbox, The How and the Why

Google Priority Inbox launched this week and there has been a huge fuss about it on sites such as TechCrunch and Wired, even the BBC is getting in on the action. Most people are calling what Google is doing a miracle but that’s not necessarily the case.

A lot of the stuff google is doing has been around for a while in fact during the final year of my undergraduate computer science course I created a system myself to help deal with email overload. The key to the system was determining which emails were important to the user and which are not. The basics of how a system such as priority mail works are fairly simple, that’s not to say that what google has done is impressive but more on that later. I figured I would share some of the knowledge that I learnt while I created my project all those years ago.

Determining the importance of an Email

So how do we determine how important an email is? For a while now spam has been a real issue for those of us that receive email. For a long time people spent huge amounts of time determining the characteristics of an email that meant it was a spam message. Things like coloring the message red were amongst the first key indicators. The thing was the spammers soon caught on to this and a new solution needed to be found. In in 2002 Paul Graham (of HackerNews and YCombinator fame) released an article called a plan for spam and later in 2003 better baysian filtering.

The articles outlined a method that could be trained to determine which messages were spam and which were important. Those articles were hugely interesting for me, not only because they were my first introduction to baysian algorithms but also because of the potential to allow users to give feedback to better understand which messages were spam.

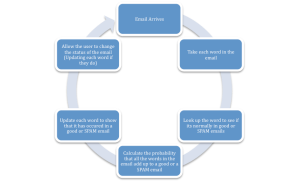
Without going into too much detail the basic premise of these articles is that you take each word within the email and look at it. If the email is a good email then you put a good mark next to that word. If the email is bad you put a bad mark next to this word. You can then see how likely it is that a given word is contained in a good email or a bad email. When a new email arrives you look at the words of that email. If the email contains words that are in more bad messages than good ones then the changes are the new email is a spam one.

This concept led to a huge leap in spam filters but its easy to see that you can take this concept further. Instead of treating words as good or bad you can treat the words as important or unimportant. That’s exactly how that piece of my final year project worked. But why stop there? What if instead of counting good and bad words you created a bunch of different categories? You could automatically filter emails into any category you choose.

Of course this all gets far cleverer when you look at how people place things as a whole and how they classify them individually. These algorithms have also gone much much further than I have described often using ontologies and other techniques to improve things.

Why is Google Priority Email so great then and What else can I do?

Well this is the killer. SPAM filters existed far before Google launched Gmail but somehow they just managed to get it right. Switching to Google apps I personally saw my 100 spam messages per day (that’s 100 getting through from 4,000) cut down to maybe one or two a week. Google has access to a lot of data, and more specifically a lot of email accounts. As more and more people use this sort of system the data can be refined. It’s for this reason that I think Google’s Priority email could be a real killer app and a real asset in our current overloaded times. However, its not the only option.

In case you aren’t aware though there are a couple of other things that you can do to help take control of your inbox. The first is to take a look at OtherInbox. These guys have been doing a lot of what Priority Inbox is offering for a long time now and by doing it I mean doing it well. The OtherInbox system can even do things like pull out delivery company notices to tell you when your parcel is going to arrive. It’s basically Google’s Priority Inbox on steroids.

If you’re a dev then you could also look at the SPAMBayes project, its open source and has a load of different options. The other key is training. Of course there’s a lot of email coming from external advertising sources but have you ever considered that you might be part of someone else’s problem? A lot of the research conducted at the university I was at showed that the sender felt that an email was far more important than the recipient felt it was. It also showed that people are often to cavalier in their attitudes to email, including too many other people in their emails or sending email when it really wasn’t necessary. There’s a bunch of research on the subject of information overload on Tom Jackson’s website that’s really worth taking a look at if your serious about reducing the problem for your business.

So yes Google Priority inbox is cool, but take a look at the other options. Above all think about how you are contributing to the solution rather than the problem of Information Overload.